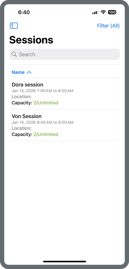
- Select your event, then click the sidebar icon in the upper-left corner and go to the Sessions Page.
- This page allows you to view and manage the list of sessions in the event.
-
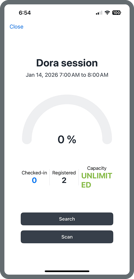
Click a session to check-in an attendee, also you can view its details, including the number of registered and checked-in attendees and the session’s capacity.
Note: If you haven’t created a session yet, you can create them in the management platform under Session Hub > Sessions.
Click here to learn more about Sessions.
-
Click the Search button to search and check-in an attendee to the session.
.png?width=149&height=311&name=image%209%20(1).png)
-
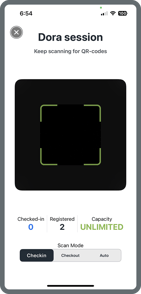
Click the Scan button to scan the attendee’s QR code. QR codes can be found in the ticket confirmation email or printed on the attendee’s badge.
-
Multiple scan modes are available. Auto mode will check-in the attendee to the session if they are not yet checked-in, or check them out if they are already checked-in.
-
When creating or editing a session in the management platform under Session Hub > Sessions, you can configure the Door Registration Policy to control how scans handle unregistered attendees:
Deny All: Prevents attendees who are not pre-registered for the session to check-in.
Auto Register: Automatically registers the attendee to the session and checks them in when their QR code is scanned.
Manual Register: Checks if the scanned attendee is pre-registered to the Session; if YES > attendee will be checked-in immediately, if NO the device operator staff will be flagged that the attendee is not pre-registered to this session and gives them the option to register them and check-in to the session or just deny access to the session and not check them in.
.png?width=670&height=384&name=image%201%20(62).png)