---
title: Import/Upload
description: Learn how to import and upload your guest list to Eventpack, sync data, use sample CSVs, and map columns for smooth event registration management.
---
[Skip to content](https://support.eventpack.com/import/upload#main-content)
English
Show submenu for translations

Open main navigation
Close main navigation
- English
Show submenu for translations
- Contact us
Contact us
How can we help you?
- There are no suggestions because the search field is empty.
1. [Eventpack Knowledge Base](https://support.eventpack.com/?hsLang=en)
2. [General](https://support.eventpack.com/general?hsLang=en)
# Import/Upload
## This guide will show you how to upload your guest list to the platform in CSV format
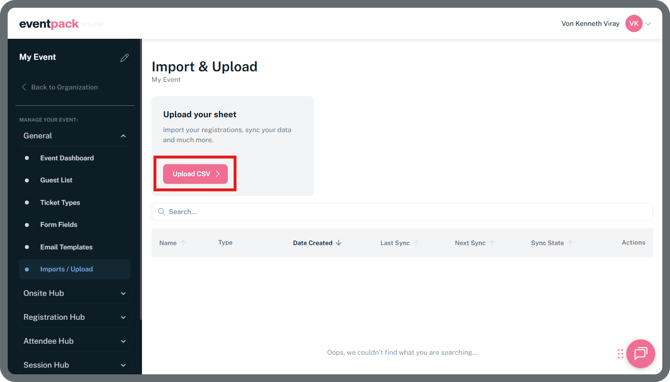
- Select your event and from the left side menu go to **General \> Import/Upload**
- Click **Upload CSV** to import your registration list and sync your data to your event. You can download and fill out the sample CSV file to ensure a smooth import process.
#### **How to use the Sample CSV**
- Click **Download Sample CSV** and open the file to see the correct format for your upload.
- The **first row** contains the Form Field names. If you use the same names as your existing Form Fields, they will be matched automatically.
- Each **row** represents a registration, and each **new column** represents a custom Form Field. If your column does not have a previously created Form Field, you can add a new form field during the upload.
#### **How to use the mapper**
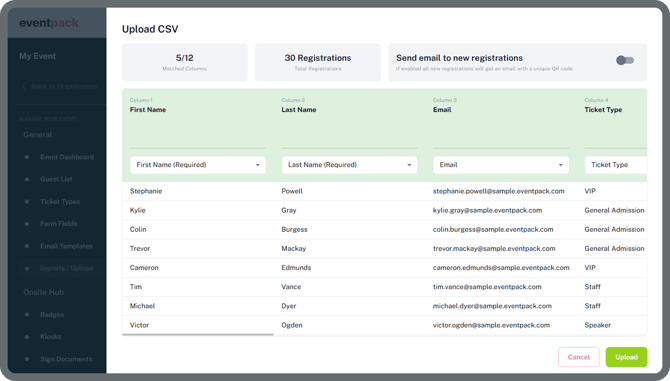
**Matched Columns**
Indicates how many columns in your file are correctly matched in the dropdown.
**Total Registrations**
Indicates the total number of registrants in the file.
**Send Email to New Registrations**
When enabled, all new registrants will receive a registration confirmation email with a PDF ticket.
#### **How to match CSV columns with Form Fields**
*First Name and Last Name fields are mandatory for every CSV upload, all other information is optional and can be uploaded if needed.*
- In each column, there is a dropdown matcher that allows you to select a Form Field based on the column’s content.
> **Green** indicates that the column is matched with a Form Field in the event.
> **Red** indicates that the column is not matched to any Form Field in the event.
- If a column is marked red, select the correct form field that matches the column’s content. Once matched, the column will turn green.
> If you haven’t created a form field yet, click here to learn more about **[Form Fields](https://support.eventpack.com/form-fields?hsLang=en)**.
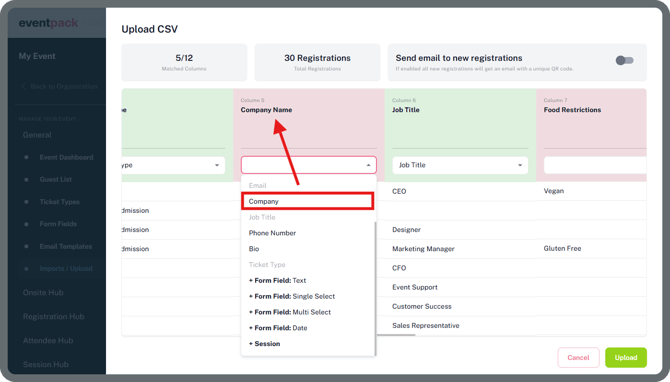
- If you want to create a new form field for a column, click the **+ Form Fields** option with desired form type.
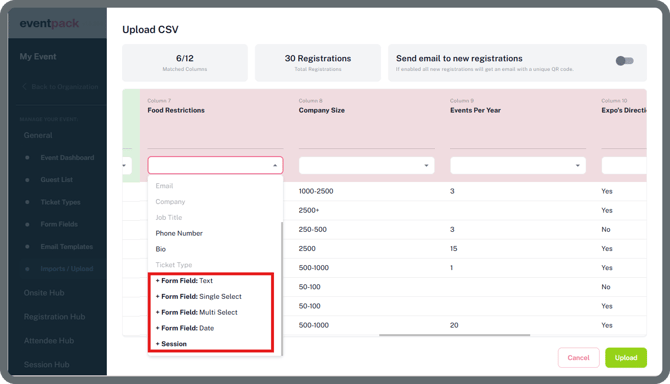
#### **Form Field Types**
1. **Text**
Allows free text answers for this form field.
2. **Single Select**
Allows attendees to select a single pre-set answer for this form field
3. **Multi Select**
Allows attendees to select a multiple pre-set answers for this form field.
- If you don’t want to upload a specific column which is included in the CSV sheet, select **Skip This Column** from the dropdown.
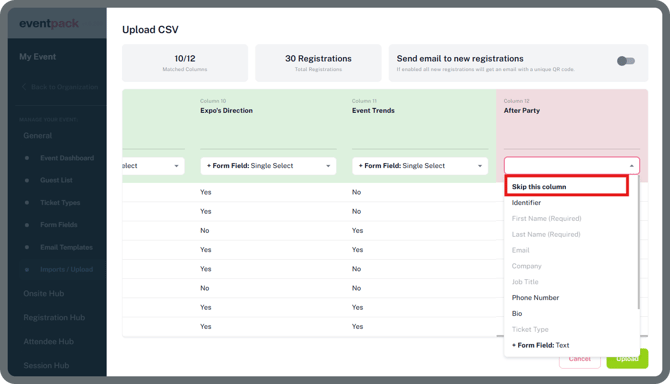
Hit the Upload button on the bottom right once all needed fields are matched (or skipped). The system will upload the data and send an email with an upload comfirmation which shows the number of uploaded attendees.
### Session Registrations
You can also upload pre-registered session data with a CSV file. To be able to do this there needs to be a separate column with the Session Name as title and a YES as content for this cell for every attendee who is pre-registered to this session. Just match the column with the correct session in the field matcher's dropdown.
If the Session is not created at the time of the upload you can create the session automatically with the upload by scrolling down in the field matcher dropdown and select **+ Session.** This will create a session with the title of the column as session name and register attendees (who are marked with YES ) for this session.
If an attendee has a NO or if the related cell is empty this attendee won't be registered to the related session.
- [General](https://support.eventpack.com/general?hsLang=en)
- [On-Site Hub](https://support.eventpack.com/on-site-hub?hsLang=en#main-content)
- [Badge Designer](https://support.eventpack.com/on-site-hub?hsLang=en#badge-designer)
- [Partner Hub (Exhibitors & Sponsors)](https://support.eventpack.com/partner-hub-exhibitors-sponsors?hsLang=en#main-content)
- [For Event Organizers](https://support.eventpack.com/partner-hub-exhibitors-sponsors?hsLang=en#for-event-organizers)
- [For Partners (Exhibitors & Sponsors)](https://support.eventpack.com/partner-hub-exhibitors-sponsors?hsLang=en#for-partners-exhibitors-sponsors)
- [Session Hub](https://support.eventpack.com/session-hub?hsLang=en)
- [Registration Hub](https://support.eventpack.com/registration-hub?hsLang=en)
- [Attendee Hub](https://support.eventpack.com/attendee-hub?hsLang=en)
- [Partner Hub](https://support.eventpack.com/partner-hub?hsLang=en)
- [On-Site App](https://support.eventpack.com/on-site-app?hsLang=en)
[](http://eventpack.com)
[mailto:email@email.com](mailto:email@email.com)
Copyright © 2026, Eventpack